
This countersink depth calculator finds the exact depth needed for a screw or bolt head to sit flush, recessed, or proud of a surface. Enter the fastener head diameter, countersink cutter angle, desired offset from flush, and material thickness. The calculator uses cone geometry based on the cutter’s half-angle to solve for depth, then reports the remaining material thickness beneath the countersink so you can confirm it is safe to drill.
Countersink Depth Calculator: Precise Flush-Fit Results
Calculate the exact countersink depth for flush, recessed, or proud screw heads using head diameter, cutter angle, and material thickness.
What This Countersink Depth Tool Solves
This tool calculates how deep to cut a countersink so a flat or oval head screw sits flush, recessed, or proud of a surface. It is built for woodworkers, cabinet makers, machinists, and DIYers who need to match a countersink cutter to a specific fastener before drilling.
The calculator solves the geometry of a cone-shaped countersink using the fastener head diameter and the cutter’s included angle. Results are mathematical estimates based on ideal cone geometry, not a substitute for test cuts in scrap material. Real cutters, drill bits, and material behavior can introduce small variations.
Steps to Find Your Countersink Depth
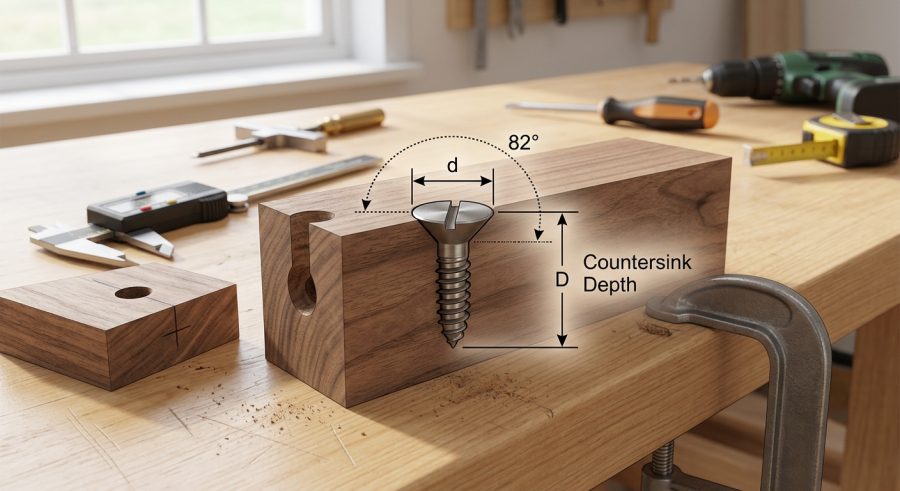
- Measure the widest point of your screw or bolt head diameter and enter it in the same unit system you plan to use throughout (millimeters or inches).
- Select the countersink cutter angle that matches your fastener or cutting tool, such as 82 degrees for ANSI flat head machine screws or 90 degrees for common wood screws.
- Enter an offset if you want the head recessed below the surface (positive number) or left slightly proud (negative number). Leave it at zero for a perfectly flush fit.
- Enter the total thickness of the material you are countersinking into.
- Review the five results to confirm the depth fits safely within your material and matches your intended finish.
Understanding Each Measurement You Enter
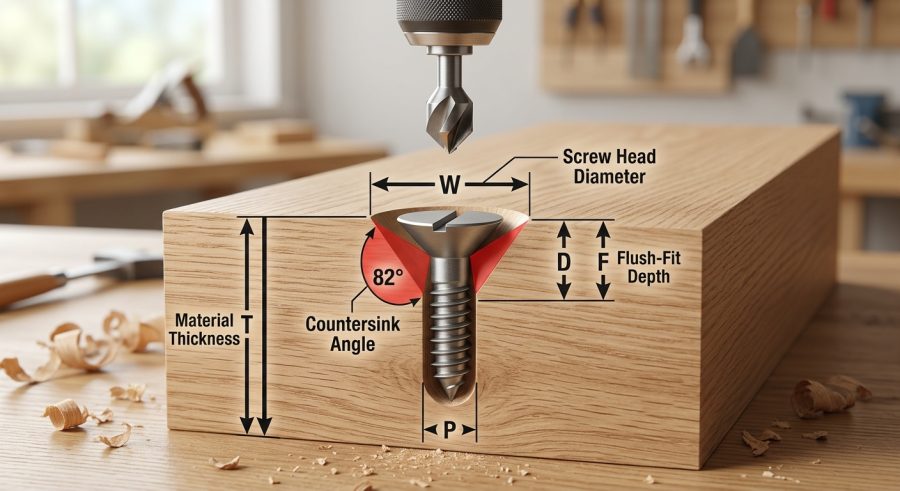
Screw Head Diameter is the widest point across the top of the fastener head, measured in millimeters or inches. Use calipers for accuracy since this value has the biggest effect on depth.
Countersink Cutter Angle is the full included angle of your countersink bit, chosen from four common options. Machine screws often use 82 or 100 degrees, while general wood and sheet metal screws commonly use 90 degrees. A 120 degree option covers shallow-angle cutters.
Additional Offset lets you fine-tune the finish. A positive value sinks the head slightly below the surface for filling or painting over. A negative value leaves the head slightly proud, which some installers prefer for later sanding flush.
Material Thickness is the full thickness of the workpiece at the fastener location, in the same unit as the head diameter and offset. This value is used only to check remaining material and does not affect the base depth calculation.
The Cone Geometry Behind the Calculation
The countersink forms a cone. The half-angle of that cone, measured from the centerline, equals half the cutter’s included angle. Depth is found using right-triangle trigonometry, where the head radius is the opposite side and depth is the adjacent side.
Base Countersink Depth = (head_diameter / 2) / tan(countersink_angle * pi / 360)
Here, head_diameter is in millimeters or inches, countersink_angle is in degrees, and pi is 3.14159265. Dividing the angle by 360 instead of 180 converts the full angle into radians for the half-angle used in the tangent function.
Total Countersink Depth = Base Countersink Depth + depth_offset, giving the actual depth to cut for a flush, recessed, or proud result.
Remaining Material Thickness = material_thickness − Total Countersink Depth. This shows how much solid material remains below the cone point.
Countersink Depth as Percent of Thickness = (Total Countersink Depth / material_thickness) × 100, a quick way to see if the countersink consumes too much of the material.
Countersink Top Diameter Check = 2 × (Total Countersink Depth × tan(countersink_angle * pi / 360)), which recalculates the resulting top diameter at the chosen depth so you can confirm it matches or slightly exceeds the head diameter.
These formulas assume a symmetric conical cutter, a flat perpendicular surface, and a flat or oval fastener head. They do not apply to socket cap, pan, or round head screws, which need a counterbore instead of a countersink.
Four Real Fastener Depth Calculations
Example 1: Standard flush wood screw. Given: head diameter 8 mm, angle 90 degrees, offset 0, thickness 12 mm. Formula: (8/2)/tan(45). Substitution: 4/1. Calculation: 4.000 mm base depth. Final result: total depth 4.000 mm, remaining thickness 8.000 mm, depth is 33.3 percent of thickness, top diameter checks out at 8.000 mm.
Example 2: Recessed machine screw in thin metal. Given: head diameter 10 mm, angle 90 degrees, offset 0.5 mm, thickness 6 mm. Formula: (10/2)/tan(45) + 0.5. Substitution: 5/1 + 0.5. Calculation: 5.500 mm total depth. Final result: remaining thickness only 0.500 mm, and depth reaches 91.7 percent of thickness, a warning sign the material is nearly too thin.
Example 3: ANSI flat head in hardwood. Given: head diameter 0.3 in, angle 82 degrees, offset 0, thickness 0.75 in. Formula: (0.3/2)/tan(41). Substitution: 0.15/0.8693. Calculation: 0.173 in base depth. Final result: total depth 0.173 in, remaining thickness 0.577 in, or 23.0 percent of the board’s thickness.
Example 4: Proud metric screw for later sanding. Given: head diameter 12 mm, angle 100 degrees, offset -0.3 mm, thickness 15 mm. Formula: (12/2)/tan(50) – 0.3. Substitution: 6/1.1918 – 0.3. Calculation: 5.035 – 0.3 = 4.735 mm total depth. Final result: remaining thickness 10.265 mm, depth is 31.6 percent of thickness, and the check diameter comes out to about 11.285 mm, slightly under the 12 mm head since the screw sits proud.
Typical Head Diameters and Depths by Screw Size
The table below shows approximate head diameters for common flat head screws and the resulting base countersink depth at a 90 degree cutter angle. These figures are general approximations; always verify against your specific fastener’s manufacturer specifications before cutting.
| Screw Size | Approx. Head Diameter (mm) | Approx. Head Diameter (in) | Base Depth at 90° (mm) |
|---|---|---|---|
| #6 | 7.3 | 0.287 | 3.65 |
| #8 | 8.5 | 0.334 | 4.25 |
| #10 | 9.7 | 0.382 | 4.85 |
| M4 | 8.0 | 0.315 | 4.00 |
| M5 | 10.0 | 0.394 | 5.00 |
| M6 | 12.0 | 0.472 | 6.00 |
Reading Your Five Depth Results
Base Countersink Depth is the theoretical cutting depth needed for the cone’s top diameter to match the head diameter exactly, with no offset applied.
Total Countersink Depth is the number you actually cut to, since it includes your offset for a recessed or proud finish. This is the primary result to set on your drill press or cutter stop collar.
Remaining Material Thickness tells you how much solid material is left beneath the countersink cone point. A very small or negative value means the countersink may break through the back of thin material.
Countersink Depth as Percent of Thickness flags risky setups. Values above roughly 50 to 60 percent generally mean the material is thin relative to the fastener and deserves extra caution or a smaller screw.
The Countersink Top Diameter Check confirms whether your chosen depth actually produces a cone wide enough to seat the head. If this number is smaller than your entered head diameter, the head will sit proud rather than flush.
All results are rounded to three decimal places for depth measurements and one decimal place for the percentage, which is precise enough for planning but should be verified with a test cut in scrap material.
What Changes Your Countersink Depth
- Head diameter accuracy: Directly changes the base depth; measuring with calipers instead of estimating improves accuracy, and the calculator fully accounts for this input.
- Cutter angle selection: A wider angle produces a shallower depth for the same head diameter; the calculator accounts for this through the tangent function.
- Offset direction: Positive offsets add depth for a recessed head, negative offsets reduce depth for a proud head; both are included in the total depth result.
- Material thickness: Only used for the remaining thickness and percentage checks, not for the base depth itself, since a thicker board does not change how deep a given head needs to sink.
- Cutter and material condition: Worn cutters, tear-out in wood, or burr formation in metal can cause real-world depth to differ slightly from the calculated value; the tool cannot account for tool wear or material defects.
- Pilot hole and drill point: The remaining thickness result does not subtract any additional depth lost to a pilot hole or drill point geometry beneath the countersink cone.
Countersinking Errors That Ruin a Flush Fit
- Mixing units: Entering head diameter in millimeters and thickness in inches gives meaningless results; keep every field in the same unit system.
- Confusing head diameter with shank diameter: Use the widest point of the head itself, not the screw’s shaft diameter, or the countersink will be too shallow.
- Guessing the cutter angle: Using the wrong angle changes the depth significantly; check your cutter’s spec sheet or the fastener’s head angle before selecting a value.
- Ignoring the remaining thickness result: A countersink that leaves very little material behind can weaken the workpiece or break through thin stock.
- Skipping a test cut: Calculated depth is a starting point; always test on scrap material since actual cutter behavior can vary slightly from ideal geometry.
- Applying this to socket or pan head screws: Those need a flat-bottomed counterbore, not a conical countersink, so this calculator’s geometry does not apply to them.
- Forgetting the offset sign: A negative offset makes the head proud, not recessed; double-check the direction before cutting.
Where This Tool's Estimates Stop
This calculator provides an estimate based on ideal cone geometry and assumes a perfectly symmetric countersink cutter, a flat perpendicular work surface, and a standard flat or oval fastener head. It does not model cutter wear, material tear-out, pilot hole depth, or drill point geometry beneath the countersink.
Results do not account for regional differences in screw head standards, which can vary slightly between manufacturers even within the same nominal size. It also cannot verify structural adequacy of the remaining material for load-bearing or safety-critical applications.
For structural, load-bearing, or safety-critical fastening work, consult an appropriately qualified engineer or tradesperson rather than relying solely on this estimate.
Countersink vs. Counterbore: Know the Difference
A countersink cuts a cone-shaped recess that matches the angled underside of a flat or oval fastener head, allowing it to sit flush with the surface. A counterbore, by contrast, cuts a flat-bottomed cylindrical hole to recess a socket cap or pan head screw, which has a flat underside rather than an angled one. This calculator’s formulas apply only to conical countersinks and flat or oval head fasteners; counterbore depth for cylindrical heads requires a different calculation based on head height rather than cone angle.
Matching Cutter Angle to Your Fastener Type
Choosing the correct angle matters as much as measuring head diameter. An 82 degree angle is the ANSI standard for flat head machine screws in the United States. A 90 degree angle is common for general wood and sheet metal screws and is often the default assumption when a fastener’s exact angle is unknown. A 100 degree angle appears on many metric flat head screws made to DIN or ISO standards. A 120 degree angle is a shallower option sometimes used for larger fasteners or softer materials where a wider, shallower recess is preferred. Using the wrong angle can leave a head sitting proud or sunk too deep, even if the depth number looks correct on paper.
Dialing In a Recessed or Proud Finish
Not every project calls for a perfectly flush head. Furniture makers often add a small positive offset, such as 0.5 to 1 mm, so the screw head sits just below the surface and can be covered with a wood plug or filler. Some metalworking applications call for a slightly proud head, using a small negative offset, to allow for later sanding or grinding flush without risking an over-deep cut. When adjusting the offset, watch the remaining material thickness and percentage results closely, since even small offset changes can matter significantly on thin stock.
Countersink Depth Questions Answered
How is countersink depth different from counterbore depth?
Countersink depth follows a cone shape sized to match an angled fastener head, calculated from head diameter and cutter angle. Counterbore depth uses a flat-bottomed cylindrical hole sized to the head's diameter and height for socket cap or pan head screws. This calculator only handles conical countersink geometry.
What countersink angle should I use for wood screws versus machine screws?
Wood and general-purpose screws commonly use a 90 degree cutter angle. Machine screws made to ANSI standards typically use 82 degrees, while many metric flat head machine screws use 100 degrees. Check your fastener's packaging or spec sheet if you are unsure.
How do I calculate countersink depth for a perfectly flush fit?
Enter your head diameter and cutter angle with the offset set to zero. The Total Countersink Depth result is the exact depth to cut so the top of the countersink cone matches the head diameter, seating the fastener flush with the surface.
What happens if the calculated countersink depth exceeds my material thickness?
The Remaining Material Thickness result will show a very small or negative number, meaning the countersink would break through the back of the material or leave almost nothing behind. In that case, use a smaller fastener head, a wider cutter angle, or thicker material.
Can I use this calculator for both metric and imperial fasteners?
Yes, as long as every input uses the same unit system. Enter head diameter, offset, and material thickness all in millimeters, or all in inches. The calculator does not convert between unit systems automatically.
Why does changing the countersink angle affect the depth so much?
The angle controls how quickly the cone widens as it deepens. A wider angle, like 120 degrees, spreads the same head diameter over a shallower depth, while a narrower angle, like 82 degrees, needs more depth to reach the same top diameter.
How much offset should I use for a slightly recessed screw head?
A small positive offset between 0.3 mm and 1 mm is typical for recessing a head enough to fill or plug over it, depending on the fastener size and finishing method. Larger offsets remove more material, so check the remaining thickness result before finalizing your depth.
Are these countersink depth results exact enough to cut without testing?
The results are precise mathematical estimates based on ideal cone geometry, not guaranteed exact outcomes. Cutter wear, material variation, and setup differences can cause small real-world deviations, so a test cut in scrap material is recommended before cutting your final workpiece.
Getting a Clean, Flush Fastener Every Time
Getting a countersink right comes down to matching the cutter angle to the fastener and cutting to the correct depth for your intended finish. This calculator turns those variables into a precise depth figure, along with checks for remaining material and top diameter. Always confirm the result with a test cut before committing to your final workpiece, especially on thin or expensive material.
