
This welding wire consumption calculator estimates how much filler wire a job needs by combining the weld’s cross-sectional area, total length, and number of joints with the material’s density and the welding process’s deposition efficiency. Enter your weld geometry, material type, process, wire diameter, and price per kilogram below to instantly see the deposited metal weight, total wire weight, spool length, and estimated cost for your project.
Welding Wire Consumption Calculator: Weight, Length & Cost
Estimate welding wire weight, spool length, and material cost from weld size, base metal, and process efficiency for MIG, TIG, stick, or flux-cored jobs.
What This Wire Estimator Calculates
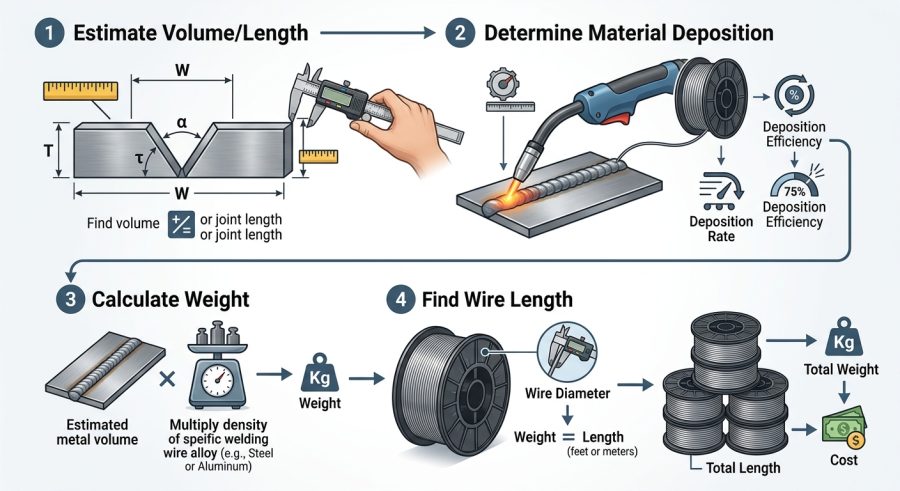
This tool estimates the amount of filler wire needed to complete a welding job. It converts your weld geometry into deposited metal weight, then adjusts for process losses and waste to give a purchase-ready wire weight, spool length, and cost. It is useful for welders planning a job, shop estimators quoting labor and material, and procurement staff ordering spools ahead of a production run.
Results are estimates, not exact measurements. Actual wire use depends on technique, machine settings, and joint fit-up, so treat the output as a planning figure rather than a guaranteed final quantity.
Steps to Estimate Your Wire Needs
- Measure or estimate the weld cross-section area in square millimeters and the length of one weld in meters.
- Enter the number of identical welds or joints in the job.
- Select the base or filler material to set the correct density.
- Choose the welding process to apply a realistic deposition efficiency.
- Adjust the waste allowance slider, then enter wire diameter and price per kilogram.
- Read the deposited weight, total wire needed, spool length, and estimated cost instantly.
Understanding Each Weld and Wire Input
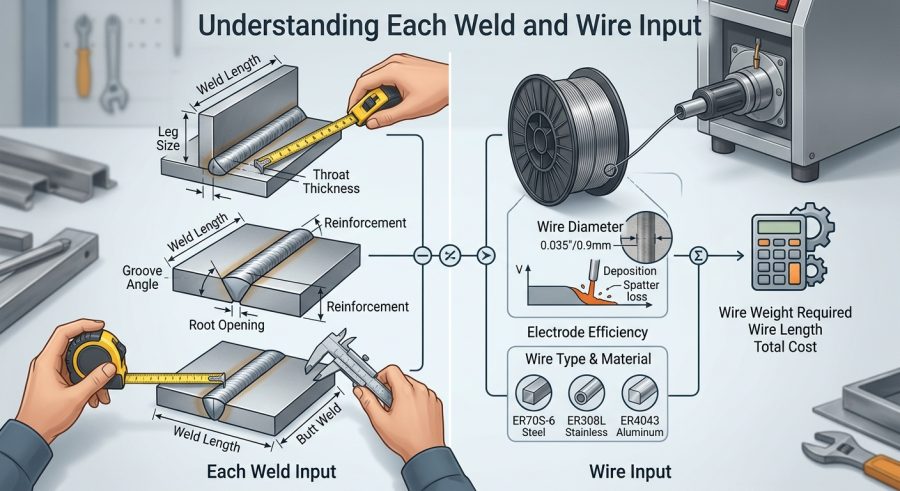
Total Weld Length per Joint (m): the length of a single weld seam, measured along the joint.
Number of Identical Welds or Joints: how many times that same weld repeats across the job.
Weld Cross-Section Area (mm2): the area of the bead’s cross-section, such as a fillet triangle or a groove fill area. This is usually estimated from the joint drawing or weld symbol.
Base/Filler Material Type: sets the density in grams per cubic centimeter used to convert volume into weight.
Welding Process: sets a typical deposition efficiency percentage, which accounts for spatter, fume loss, and stub-end waste specific to that process.
Waste & Contingency Allowance (%): an extra buffer you set for tack welds, arc starts, rework, and handling losses beyond the process efficiency figure.
Wire Diameter (mm): the diameter of the filler wire, used to convert weight into an equivalent spool length.
Wire Price per Kilogram: your cost per kilogram in whatever currency you use; the cost result carries that same currency.
How Weight, Length, and Cost Are Derived
Weld metal volume (cm3) = cross-section area (mm2) x weld length (m) x number of welds. Because 1 mm2 times 1 m of length equals 1 cm3, no separate unit conversion step is needed.
Deposited weld metal weight (kg) = volume (cm3) x material density (g/cm3) / 1000. This converts the metal volume that ends up in the joint into a weight.
Total wire required (kg) = deposited weight / (deposition efficiency / 100) x (1 + waste factor / 100). Dividing by efficiency accounts for wire that never becomes deposited weld metal, and the waste factor adds your own contingency on top.
Estimated wire length (m) converts total wire weight into a volume in cubic millimeters using density, then divides by the wire’s circular cross-section area (pi x radius squared) to get a length in millimeters, finally converting to meters.
Estimated wire cost = total wire required (kg) x price per kilogram. All formulas assume a constant cross-section along the weld and a solid, uniform-diameter wire.
Sample Calculations for Common Weld Jobs
Example 1 – Small steel fillet weld with MIG-like default settings. Given: length 1 m, 1 weld, area 20 mm2, steel (7.85 g/cm3), efficiency 85%, waste 10%, wire 1.2 mm, price 5 per kg. Volume = 20 x 1 x 1 = 20.00 cm3. Weight = 20 x 7.85 / 1000 = 0.16 kg. Total wire = 0.16 / 0.85 x 1.10 = 0.20 kg. Length is about 22.9 m. Cost = 0.20 x 5 = 1.02.
Example 2 – Aluminum MIG job with several short fillets. Given: length 2 m, 5 welds, area 15 mm2, aluminum (2.70 g/cm3), GMAW 95%, waste 5%, wire 1.0 mm, price 8 per kg. Volume = 15 x 2 x 5 = 150.00 cm3. Weight = 150 x 2.70 / 1000 = 0.41 kg. Total wire = 0.41 / 0.95 x 1.05 is about 0.45 kg. Length is about 211.1 m. Cost is about 3.58.
Example 3 – Stainless steel repair with stick electrode. Given: length 0.5 m, 10 welds, area 30 mm2, stainless (8.00 g/cm3), SMAW 65%, waste 15%, wire 3.2 mm, price 12 per kg. Volume = 30 x 0.5 x 10 = 150.00 cm3. Weight = 150 x 8 / 1000 = 1.20 kg. Total wire = 1.20 / 0.65 x 1.15 is about 2.12 kg. Length is about 33.0 m. Cost is about 25.48.
Example 4 – Large structural job with self-shielded flux-cored wire. Given: length 10 m, 20 welds, area 50 mm2, steel (7.85 g/cm3), FCAW-S 80%, waste 10%, wire 1.6 mm, price 4.50 per kg. Volume = 50 x 10 x 20 = 10,000.00 cm3. Weight = 10,000 x 7.85 / 1000 = 78.50 kg. Total wire = 78.50 / 0.80 x 1.10 is about 107.94 kg. Length is about 6,839.0 m. Cost is about 485.72.
Deposition Efficiency and Waste Guidelines by Process
| Process | Typical Deposition Efficiency | Suggested Waste Allowance | Common Use |
|---|---|---|---|
| SMAW (Stick) | 65% | 10-15% | Field repair, maintenance |
| GMAW (Solid Wire MIG) | 95% | 3-8% | Production shop welding |
| FCAW-G (Gas-Shielded Flux Core) | 85% | 5-10% | Structural steel, shipbuilding |
| FCAW-S (Self-Shielded Flux Core) | 80% | 8-12% | Outdoor and field structural work |
| SAW (Submerged Arc) | 99% | 2-5% | Heavy plate, long straight seams |
Reading Your Weight, Length, and Cost Results
Total Weld Metal Volume (cm3): the raw geometric volume of metal that fills the joint, before any process losses.
Deposited Weld Metal Weight (kg): that volume converted to weight using material density – this is the metal that actually ends up in the finished weld.
Total Wire Required (kg): the purchase quantity, inflated for process efficiency losses and your waste allowance. Use this figure when ordering spools.
Estimated Wire Length Needed (m): the same wire weight expressed as a length, useful for checking against spool length ratings.
Estimated Wire Cost: total wire required multiplied by price per kilogram, in the currency you entered.
What Changes Your Wire Requirement Most
Joint design and cross-section: larger groove angles, thicker root gaps, and multi-pass grooves increase cross-section area and therefore volume dramatically.
Welding process choice: lower-efficiency processes like stick welding require proportionally more purchased wire for the same deposited weight.
Wire diameter: thinner wire yields a longer spool length for the same weight, which matters when comparing spool sizes.
Material density: aluminum jobs need less weight but often more volume than steel jobs of the same size, because density is roughly a third of steel’s.
Operator skill and fit-up: poor fit-up, excessive tacking, and rework raise real-world consumption above the calculated baseline, which is why the waste allowance exists.
Errors That Skew Wire Estimates
Estimating cross-section area from a nominal weld size rather than the actual fill area, especially for grooves with several passes, is the most common error and can understate wire needs.
Forgetting to multiply by the number of identical welds leads to ordering far too little wire for repetitive production jobs.
Using a generic deposition efficiency instead of the one matching the actual process and shielding gas can shift results by 15-20 percentage points.
Ignoring the waste allowance entirely under-orders wire, since real jobs always lose some material to spatter, stub ends, and setup.
Mixing units, such as entering weld length in millimeters instead of meters, produces results that are off by a factor of a thousand.
What This Estimate Does Not Cover
This calculator assumes a constant, uniform cross-section along the entire weld length, which is rarely exact for tapered or variable-penetration welds.
It does not account for preheat, interpass temperature control, or multi-pass sequencing details that can change actual burn-off rates.
Deposition efficiency values are typical industry figures, not measurements from your specific machine, technician, or shielding gas mixture.
The tool does not model wire diameter tolerance, spool packaging waste, or supplier-specific spool weights, so final purchase quantities should be rounded up to available spool sizes.
Converting Standard Weld Sizes into Area
For an equal-leg fillet weld, cross-section area in mm2 is approximately 0.5 x leg size squared. A 6 mm fillet leg gives about 18 mm2, while an 8 mm leg gives about 32 mm2. For groove welds, sketch the fill area including root, sidewalls, and any reinforcement crown, then estimate that shape’s area rather than relying on plate thickness alone.
Matching Wire Diameter to Spool Length
The same wire weight yields very different spool lengths depending on diameter, since length scales inversely with the square of the radius. A thin 0.9 mm wire packs far more length per kilogram than a 1.6 mm wire. Compare the calculator’s estimated length against your spool’s rated length to decide whether one spool covers the job or several are needed.
Scaling Estimates for Multi-Pass Groove Welds
For thick-plate groove welds requiring several passes, enter the combined cross-section area of all passes as a single value, since the calculator treats the joint as one filled volume regardless of how many passes create it. Add extra waste allowance for multi-pass work to cover interpass grinding and increased stub-end losses.
Putting Your Wire Estimate to Work
Use this calculator early in project planning to translate weld geometry into a concrete wire order, then round up to the nearest available spool size. Re-run the numbers whenever joint design, process, or wire diameter changes, and lean toward the higher end of the waste allowance range for field conditions. Treat every result as a planning estimate to confirm against actual consumption once the job is underway.
